Frontend-Interview
React Interview
What is hoisting
- Hoisting: Makes some types of variables accessible/usable in the code before they are actually declared. “Variables lifted to the top of their scope”.
Scope
What is promise
Ans : The phenomenon which happens when we nest multiple callbacks within a function is called a callback hell. The shape of the resulting code structure resembles a pyramid and hence callback hell is also called the “pyramid of the doom”. It makes the code very difficult to understand and maintain. A promise is an object in JavaScript that represents the eventual completion or failure of an asynchronous operation and its resulting value. It is a way to handle asynchronous operations in a more structured and manageable manner.
Promises are commonly used when dealing with operations such as making HTTP requests, reading/writing files, interacting with databases, or any other task that takes time to complete. Instead of relying on callback functions, promises provide a more organized way to handle asynchronous code.
A promise can be in one of three states:
Pending: The initial state when the promise is created and the asynchronous operation is still in progress. Fulfilled: The state when the asynchronous operation is successfully completed, and the promise is resolved with a value. Rejected: The state when the asynchronous operation encounters an error or fails, and the promise is rejected with a reason (an error object). The core idea of promises is that they allow you to attach callbacks (functions) to handle the fulfillment or rejection of the promise. This helps to separate the logic for handling successful and failed outcomes.
const myPromise = new Promise((resolve, reject) => {
  setTimeout(() => {
    const randomNum = Math.random();
    if (randomNum < 0.5) {
      resolve(randomNum); // Resolves the promise with a value
    } else {
      reject(new Error('Something went wrong')); // Rejects the promise with an error
    }
  }, 2000); // Simulating a 2-second delay
});

// Attaching callbacks to handle fulfillment and rejection
myPromise
  .then(result => {
    console.log('Promise resolved with result:', result);
  })
  .catch(error => {
    console.error('Promise rejected with error:', error);
  });
Promise Channing
Ans : Promise chaining: Promise chaining is a syntax that allows you to chain together multiple asynchronous tasks in a specific order. This is great for complex code where one asynchronous task needs to be performed after the completion of a different asynchronous task.
new Promise(function(resolve, reject) {

  setTimeout(() => resolve(1), 1000); // (*)

}).then(function(result) { // (**)

  alert(result); // 1
  return result * 2;

}).then(function(result) { // (***)

  alert(result); // 2
  return result * 2;

}).then(function(result) {

  alert(result); // 4
  return result * 2;

});
Promise.all
- Ans : Promise.all in JavaScript is a built-in functional method that takes in an array of promises as input and returns a single promise only after resolving all the promises of the input array in sequential order. Promise.all in JavaScript throws an error if any one of the passed promises in the input gets rejected, independent of the results of other promises. If the promise returned by this function is resolved, it returns an array consisting of all the returned resolved values of the promises array that was passed as an argument.
const p1 = Promise.resolve("pi"); //returns a promise of resolved value "pi"
const p2 = 3.14;
const p3 = new Promise((resolve, reject) => { //promise method to resolve or reject values
    resolve("Maths"); //p3 contains a promise of resolving "maths" value
});

let returned_promise = Promise.all([p1, p2, p3]); //checking fulfillment or rejection of any of the promises: p1,p2 and p3 passed as iterable in the function

returned_promise.then((array)=>{ //returned_promise will contain final returned value of Promise.all() method
    console.log(array); //checking and printing the value returned as promised by Promise.all() method in JS
})
output:
[ 'pi', 3.14, 'Maths' ]
Promise.allsettled
- In terms of rejecting promises:
- Promise.all() method rejects itself if any of the passed in promise input inside an array is rejected. That is, this method will only run if and only if all the promises are fulfilled or resolved successfully, otherwise, in the output, it would produce an error message. Promise.allSettled() method will not reject itself if any of the passed in promise input inside an array is rejected. That is, this method will irrespective of any promise be in the rejected state too.
- In terms of their outputs:
Promise.all() : method returns an array as an output containing promise data inside several indexes.
Promise.allSettled() method returns an array of objects and each of these objects further contains two properties further status and value.
Promise.race
Ans : The Promise.race() method returns a promise that fulfills or rejects as soon as one of the promises in an iterable fulfills or rejects, with the value or reason from that promise. We may think of this particular method as in the form of a real-life example where several people are running in a race whosoever wins comes first wins the race, the same scenario is here, which ever promise successfully fulfills or rejects at early will be executed at first and rest one’s results will not be displayed as an output.
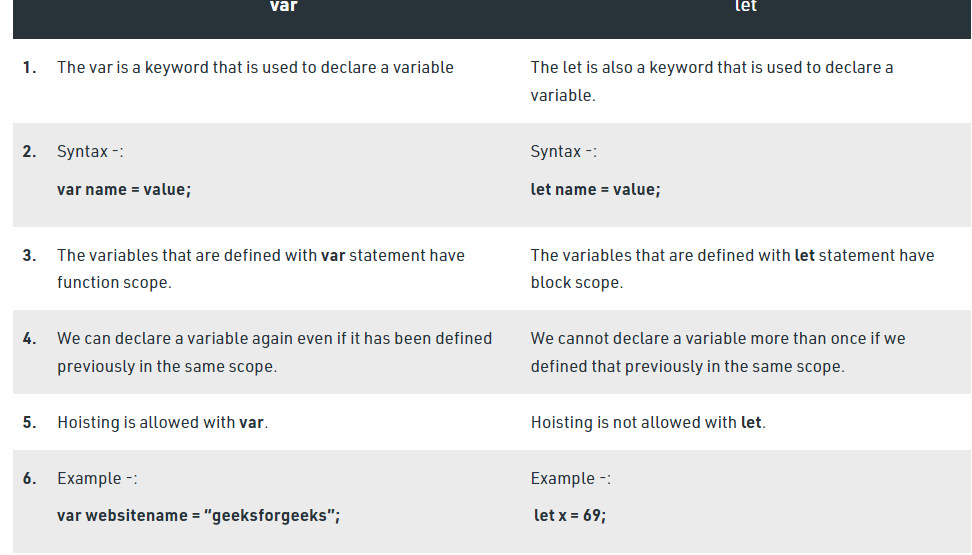
let vs var
What are the advantages of using React?
- Use of Virtual DOM to improve efficiency: React uses virtual DOM to render the view. As the name suggests, virtual DOM is a virtual representation of the real DOM. Each time the data changes in a react app, a new virtual DOM gets created. Creating a virtual DOM is much faster than rendering the UI inside the browser. Therefore, with the use of virtual DOM, the efficiency of the app improves.
- Gentle learning curve: React has a gentle learning curve when compared to frameworks like Angular. Anyone with little knowledge of javascript can start building web applications using React.
- SEO friendly: React allows developers to develop engaging user interfaces that can be easily navigated in various search engines. It also allows server-side rendering, which boosts the SEO of an app.
- Reusable components: React uses component-based architecture for developing applications. Components are independent and reusable bits of code. These components can be shared across various applications having similar functionality. The re-use of components increases the pace of development.
- Huge ecosystem of libraries to choose from: React provides you with the freedom to choose the tools, libraries, and architecture for developing an application based on your requirement.
What are the limitations of React?
- The few limitations of React are as given below:
- React is not a full-blown framework as it is only a library.
- The components of React are numerous and will take time to fully grasp the benefits of all.
- It might be difficult for beginner programmers to understand React.
- Coding might become complex as it will make use of inline templating and JSX.
Can we use class component life cycle method inside function component
3 phases: Mounting, Updating, Unmounting
Mounting: constructor → render → DOM update → componentDidMount
Updating: render → DOM update → componentDidUpdate
Unmounting: componentWillUnmount
- https://legacy.reactjs.org/docs/hooks-faq.html#from-classes-to-hooks
- useEffect allows you to perform side effects, such as fetching data or updating the DOM, after the component has rendered. It replaces the componentDidMount, componentDidUpdate, and componentWillUnmount lifecycle methods of class components.
- useLayoutEffect is similar to useEffect, but it is called synchronously after all DOM mutations. It can be used to perform DOM measurements or to make sure the component is fully rendered before doing any work.**
1. Mounting:
##### constructor() : - Class:The constructor() method is called before anything else, when the component is initiated, and it is the natural place to set up the initial state and other initial values. The constructor() method is called with the props, as arguments, and you should always start by calling the super(props) before anything else, this will initiate the parent's constructor method and allows the component to inherit methods from its parent (React.Component). - Function: Function components don’t need a constructor. You can initialize the state in the useState call. If computing the initial state is expensive, you can pass a function to useState. ##### getDerivedStateFromProps() : - Class : The getDerivedStateFromProps() method is called right before rendering the element(s) in the DOM. This is the natural place to set the state object based on the initial props. It takes state as an argument, and returns an object with changes to the state. The example below starts with the favorite color being "red", but the getDerivedStateFromProps() method updates the favorite color based on the favcol attribute: - Function: Not required ##### render() : - Class:The render() method is required, and is the method that actually outputs the HTML to the DOM. - Function: This is the function component body itself.
##### componentDidMount() : - Class:The componentDidMount() method is called after the component is rendered. This is where you run statements that requires that the component is already placed in the DOM. - Function:The componentDidMount() method is called after the component is rendered.
 useEffect(() => {
        console.log("UseEffect hook after component mounted.")
    }, [])
2. Updating :
- The next phase in the lifecycle is when a component is updated.
getDerivedStateFromProps():
- Class:Also at updates the getDerivedStateFromProps method is called. This is the first method that is called when a component gets updated. This is still the natural place to set the state object based on the initial props.
- Function:Not required
shouldComponentUpdate()
- Class:In the shouldComponentUpdate() method you can return a Boolean value that specifies whether React should continue with the rendering or not. The default value is true.
- Function: In the shouldComponentUpdate() method you can return a Boolean value based on prop comparions if its changes from previous value, that specifies whether React should continue with the rendering or not.
First Way :
// props: {name}
// state: {visible}

useEffect(() => {
  // ... code to run

  // the dependency array below is "equivalent" to:
  // the effect will trigger if
  // props.name !== nextProps.name || state.enabled !== nextState.enabled
}, [name, visible])
Second Way :You can wrap a function component with React.memo to shallowly compare its props:
const Button = React.memo((props) => {
  // your component
});
render() :
- Class:The render() method is of course called when a component gets updated, it has to re-render the HTML to the DOM, with the new changes
- Function:This is the function component body itself.
getSnapshotBeforeUpdate() :
- Class:In the getSnapshotBeforeUpdate() method you have access to the props and state before the update, meaning that even after the update, you can check what the values were before the update.
- Function: No Hooks
componentDidUpdate():
- Class:The componentDidUpdate method is called after the component is updated in the DOM.
- Function:
import React, { useEffect, useState } from 'react'

function UseEffectAsDidUpdate() {

    const [name, setName] = useState("");

    /* runs on first render and whenever dependency array
        state change.
    */
    useEffect(() => {
        console.log(`name is changed ${name}`);
    }, [name])

    return (
        <input
            placeholder="enter name"
            onChange={e => setName(e.target.value)}
        />
    )
}

export default UseEffectAsDidUpdate;
3. Unmounting
- Class:The next phase in the lifecycle is when a component is removed from the DOM, or unmounting as React likes to call it.
- Function:
componentWillUnmount
import React, { useEffect, useState } from 'react'

function UseEffectAsWillUnmount() {

    const [width, setWidth] = useState(window.innerWidth);

    /* This run after first render and set eventlistener on resize.
        And before unmount we are returning cleanup function
         which should run before unmount.
    */
    useEffect(() => {
        window.addEventListener("resize", updateWindowWidth)

        /* Cleanup process --->
            This run before unmount and remove eventlistener.
        */
        return () => {
            window.removeEventListener("resize", updateWindowWidth);
        }
    }, [])

    const updateWindowWidth = () => {
        setWidth(window.innerWidth)
    }

    return (
        <div>
            <h2>Windows Inner Width: {width}</h2>
        </div>
    )
}

export default UseEffectAsWillUnmount;
What is the recommended ordering of methods in class component?
- static methods
- constructor()
- getChildContext()
- componentWillMount()
- componentDidMount()
- componentWillReceiveProps()
- shouldComponentUpdate()
- componentWillUpdate()
- componentDidUpdate()
- componentWillUnmount()
- click handlers or event handlers like onClickSubmit() or onChangeDescription()
- getter methods for render like getSelectReason() or getFooterContent()
- optional render methods like renderNavigation() or renderProfilePicture()
- render()
How do you optimize the performance of a React application?
Minimize Render Operations
- Prevent Child re render
Memoization
- React.Memo for component memoization when input is changing then only the component will re-render
const Archive = memo( component)
- useMemo : for Object value memoization
     const archiveOptions = useMemo(() => {
    return {
      show: false,
      title: `Post archive in addition to ${posts.length} main posts`,
    };
  }, [posts.length]);
   <Archive
        archiveOptions={archiveOptions}
        onAddPost={handleAddPost}
        setIsFakeDark={setIsFakeDark}
      />
- useCallback : for unction memoization
       const handleAddPost = useCallback(function handleAddPost(post) {
    setPosts((posts) => [post, ...posts]);
  }, []);

   <Archive
        archiveOptions={archiveOptions}
        onAddPost={handleAddPost}
        setIsFakeDark={setIsFakeDark}
      />
Use React Profiler
Lazy Loading
const Homepage = lazy(() => import("./pages/Homepage"));
What is the difference between “client-side” and “server-side” rendering in React?
The difference between client-side rendering and server-side rendering in React relates to where the rendering process takes place—either on the client (browser) or the server.
Client-side rendering: - In client-side rendering, the initial HTML is sent to the browser, typically a minimal HTML file with a reference to the JavaScript bundle. - The JavaScript bundle, generated by tools like webpack, is responsible for rendering the React components in the browser. - The browser downloads the JavaScript bundle and executes it, which then renders the React components and handles subsequent updates and interactions. - The application's state and logic reside on the client-side, and the server primarily serves data through APIs or endpoints.
Advantages of client-side rendering: - Provides a rich, interactive user experience with smooth transitions and dynamic updates. - Allows for a single-page application (SPA) architecture where navigation occurs without full page reloads. - Facilitates a separation between the client-side and server-side codebase, enabling front-end and back-end teams to work independently.
Disadvantages of client-side rendering: - Initial load time can be slower since the browser needs to download the JavaScript bundle and render the components before displaying the content. - Search engine optimization (SEO) can be challenging since search engine crawlers may have difficulty interpreting JavaScript-rendered content. - Limited performance on low-powered devices or slower networks due to the reliance on client-side processing.
Server-side rendering: - In server-side rendering (SSR), the server generates the HTML content with the pre-rendered React components and sends it to the browser. - The server executes the React component code and renders the resulting HTML, including the initial data fetched from APIs or databases. - The browser receives the fully rendered HTML and can display it immediately. - Once the JavaScript bundle is downloaded and executed on the client, it takes over the rendering and handling of subsequent updates.
Advantages of server-side rendering: - Faster initial page load since the server sends pre-rendered HTML, reducing the time needed for the client to display the content. - Improved SEO as search engine crawlers can more easily parse and index server-rendered content. - Better performance on low-powered devices or slower networks since the processing happens on the server.
Disadvantages of server-side rendering: - More complex server setup and infrastructure requirements to handle rendering React components on the server. - Increased server load as the server needs to handle the rendering for each incoming request. - Limited interactivity on the initial page load until the JavaScript bundle is downloaded and executed on the client.
It's important to note that React supports both client-side rendering and server-side rendering. Developers can choose the approach based on their project's requirements, performance goals, and trade-offs. Additionally, hybrid approaches like hybrid rendering or dynamic rendering can be used to combine the benefits of both client-side and server-side rendering.
How do you implement server-side rendering in a React application?
To implement server-side rendering (SSR) in a React application, you can follow these general steps:
-
Set up a Node.js server: Create a server using a Node.js framework like Express or Koa to handle incoming HTTP requests.
-
Configure Babel: Configure Babel to transpile your server-side code, including JSX syntax and ES modules, so that it can be executed on the server.
-
Create a server-side entry point: Create a server-side entry point file that will handle the server-side rendering logic. This file will typically import your React components, configure any necessary data fetching, and render the React components to HTML.
-
Configure Webpack: Set up Webpack to build a server-side bundle that includes your server-side entry point file and its dependencies. Configure the appropriate loaders for transpiling and bundling your server-side code.
-
Implement server-side rendering logic: In your server-side entry point file, use a server-side rendering library like ReactDOMServer (provided by React) or Next.js (a React framework that includes SSR capabilities) to render your React components to HTML on the server.
-
Fetch data: If your application requires data from APIs or databases, implement the necessary data fetching logic on the server before rendering the React components. This can be done using libraries like Axios, Fetch, or GraphQL clients.
-
Pass initial state: If your application uses Redux, React Context, or any other state management solution, you'll need to pass the initial state from the server to the client. This allows the client-side code to pick up where the server left off without re-fetching data.
-
Handle routing: Implement server-side routing if needed, ensuring that the server can handle different URLs and render the appropriate components accordingly.
-
Send the rendered HTML to the client: Once the server has rendered the React components to HTML, send the HTML response back to the client along with any necessary assets (e.g., CSS, JavaScript bundles) for the client to hydrate and take over the rendering on the client-side.
-
Client-side hydration: On the client-side, include the necessary JavaScript bundles and hydrate the rendered HTML using React's ReactDOM.hydrate method. This process attaches event handlers and initializes the client-side React components while preserving the server-rendered markup.
-
Handle client-side navigation: Ensure that client-side navigation works correctly by intercepting the clicks on internal links and handling them with client-side routing, allowing the React components to handle subsequent navigation without full page reloads.
By following these steps, you can implement server-side rendering in your React application. It's worth noting that libraries like Next.js abstract away much of the complexity involved in setting up SSR, making it easier to implement and manage server-side rendering in a React application.
What is the purpose of the “PureComponent” class in React?
In React, PureComponent is a base class that you can use to create components that automatically optimize rendering performance. It is an alternative to the regular Component class provided by React.
The main difference between PureComponent and Component lies in how they handle the shouldComponentUpdate method:
-
Component: By default, theshouldComponentUpdatemethod ofComponentreturnstrue, causing the component to re-render whenever its state or props change. This behavior can potentially lead to unnecessary re-renders if the component's props or state haven't actually changed. -
PureComponent: ThePureComponentclass, on the other hand, implements a shallow comparison of the component's props and state in itsshouldComponentUpdatemethod. If the shallow comparison indicates that the props and state haven't changed, the component won't re-render. This optimization can improve performance by preventing unnecessary renders when the component's output wouldn't be affected.
To implement a PureComponent in your React application, follow these steps:
- Import the
PureComponentclass from thereactpackage:
import React, { PureComponent } from 'react';
- Create your component by extending the
PureComponentclass instead of the regularComponentclass:
   class MyComponent extends PureComponent {
     // Component implementation
   }
-
Implement the necessary render method and any additional methods or lifecycle hooks required for your component.
-
Use the
MyComponentin your application like any other React component:
   function App() {
     return <MyComponent />;
   }
By using PureComponent, React handles the optimization of shallow comparisons for you. It automatically compares the props and state of your component and determines whether a re-render is necessary. This can be particularly useful when dealing with large or complex components that may benefit from avoiding unnecessary renders.
However, it's important to note that PureComponent is not always the best choice. The shallow comparison performed by PureComponent can be less efficient for deeply nested or complex data structures. In such cases, it's recommended to use the Component class and manually implement the shouldComponentUpdate method with a more customized comparison logic to achieve optimal performance.
No, PureComponent is not available directly in function components. It is a class-based component that extends the Component class provided by React.
However, in React, you can achieve similar performance optimizations in function components by using React's memo higher-order component or the React.memo function. These allow you to memoize the component and prevent unnecessary re-renders.
What is the purpose of the “lazy” and “suspense” APIs in React?
- Lazy Loading (lazy API): The "lazy" API enables you to load components asynchronously, i.e., on-demand when they are actually needed, rather than loading them all upfront when the application starts
- Handling Loading States (suspense API):
By wrapping the lazy loaded components or other asynchronous operations with the
component, you can provide a fallback UI while the content is being loaded. If an error occurs during the loading process, you can also define an error boundary to handle the error gracefully.
What is portal?
In React, a portal is a way to render a component's content in a different location in the DOM hierarchy than its parent component. It allows you to render a component's UI to a different DOM element outside of its parent component's hierarchy.
Portals are useful in scenarios where you need to render a component's content outside of its current DOM context, such as rendering a modal or tooltip that overlays the entire application or rendering a component inside a specific container that is outside the normal component tree.
To create a portal in React, you can use the ReactDOM.createPortal() method, which takes two arguments: the content you want to render and the DOM element where you want to render it.
Here's an example of using a portal in React:
import ReactDOM from 'react-dom';

function Modal(props) {
  return ReactDOM.createPortal(
    <div className="modal">
      <h2>{props.title}</h2>
      <p>{props.content}</p>
    </div>,
    document.getElementById('modal-root') // The DOM element where the portal content will be rendered
  );
}

function App() {
  return (
    <div>
      <h1>My App</h1>
      {/* Other components */}
      <Modal title="My Modal" content="This is a modal dialog." />
    </div>
  );
}

ReactDOM.render(<App />, document.getElementById('root'));
In the example above, the Modal component is rendered as a portal using ReactDOM.createPortal(). The content of the Modal component, including the title and content, will be rendered inside the DOM element with the ID modal-root, which can be located anywhere in the HTML document.
By using portals, you can render components outside of their normal parent-child hierarchy, giving you more flexibility in rendering and managing UI elements in your React application.
what is Error boundary
In React, an Error Boundary is a component that catches JavaScript errors anywhere in its child component tree and handles them gracefully, preventing the entire application from crashing. Error Boundaries are used to display fallback UI or error messages when an error occurs within their subtree.
To create an Error Boundary in React, you need to define a component that implements the componentDidCatch lifecycle method. This method is called when an error is thrown in any of the component's descendants.
Here's an example of how to create and use an Error Boundary in React:
class ErrorBoundary extends React.Component {
  constructor(props) {
    super(props);
    this.state = { hasError: false };
  }

  componentDidCatch(error, errorInfo) {
    // Update state to display an error message
    this.setState({ hasError: true });
    // You can also log the error to an error reporting service
    console.error(error, errorInfo);
  }

  render() {
    if (this.state.hasError) {
      // Render fallback UI or error message
      return <div>Something went wrong.</div>;
    }

    // Render the normal component tree
    return this.props.children;
  }
}

function App() {
  return (
    <div>
      <h1>My App</h1>
      <ErrorBoundary>
        {/* Components that may throw errors */}
        <Component1 />
        <Component2 />
      </ErrorBoundary>
    </div>
  );
}

ReactDOM.render(<App />, document.getElementById('root'));
In the example above, the ErrorBoundary component is defined as a class component that implements the componentDidCatch lifecycle method. If an error occurs within its child components (Component1 and Component2), the componentDidCatch method is triggered. It updates the component's state to indicate that an error has occurred (hasError: true). The render method of the ErrorBoundary component conditionally renders the fallback UI or error message when hasError is true.
To use the Error Boundary, you wrap the components that you want to handle errors with the ErrorBoundary component. In this example, Component1 and Component2 are wrapped with the ErrorBoundary component to catch any errors they might throw.
By using Error Boundaries, you can prevent the entire application from crashing when an error occurs in a specific component tree. Instead, you can display a fallback UI or an error message to the user, providing a better user experience and making it easier to diagnose and fix the error.
Medium
What is Redux?
Redux is a library for managing application state Redux is a solution for global state management, allowing you to pass data without the need to pass props through every level (aka props drilling) Inspired by Facebook’s flux architecture
What are the main constituents of Redux?
Actions
Actions are plain Javascript objects with type property to indicate what type of action is being performed Actions are dispatched to the central store using store.dispatch() Actions are usually created by Action Creator functions, which given some input generates the corresponding action. Reducers
Reducers are functions that take an Action and a current state and returns the resulting state Reducers must be pure functions and have no side effects Store
The Store is the central object that maintains and updates the application state The Store also handles the registration and unregistering of listeners
How does Redux work?
Redux revolves around strict unidirectional data flow First: an Action is dispatched to the store via store.dispatch(action) Second: Redux determine the resultant state by calling a Reducer function Third: The root reducer combines the output of multiple reducers into a single state tree Fourth: The Store saves the new state tree and notifies listeners that are registered
What are Redux Selectors?
A Selector is a function that takes in the Redux store state and returns the derived desired data from that state. Selectors allow the Redux store state to be as minimal as possible by computing data off of the state Selectors allow for better separation of concern by keeping components free from state transformation logic Selector computations can be memoized to prevent additional computation Selectors can also be composed and reused across an application
What is Redux Toolkit?
Redux Toolkit: an official opinionated Redux toolset to get you up and running quickly with Redux without having the worry about the boilerplate. Comes with premade functions and utilities that help easily configure the store and create actions and reducers. Redux Toolkit comes baked with widely used Redux Addons: Redux Thunk — Middleware for async logic Reselect — Easily create memoized selectors
What is the difference between == and ===?
The usual answer would be one compares only the values while the other also compares the type. In this case, follow up question would be: Why null == undefined is true? As you can guess their values will never be equal.
A good answer is that == runs the loose equality check while === also compares the types. The loose equality check looks at the type on both sides and based on the types it decides what to do. The specifications states that if both sides of the comparison are null and undefined just return true.
So, it may just return true like in the case of null with undefined or it may try to convert one or the other side to the same type and compare their values depending on what is specified for a certain scenario.
What are closures and lexical scope?
A closure is when a function is able to remember and access its lexical scope even when that function is executed outside of that scope. A good example for closures is currying, a common accepted answer is also responding that an inner function returned by an outer function has access to its outer functions variables even after the outer function was called. Lexical scope is the scope model used by JavaScript which compared to dynamic scoping enables a lot of cool features. If someone also explains lexing time and goes into hoisting it is a big bonus.
What is data mutation and how to prevent it?
- This is a bit tricky question as there are multiple correct answers and approaches. What we look for is understanding that arrays and objects can be passed around and since they are references, we are changing the original array or object. This leads to side effects and often to unwanted behaviour. The preferred way is never to mutate objects or arrays and when modifying, always create and return a new copy. We can take advantage of the spread operator, object.assign or libraries like ImmutableJS. Mentioning array.slice vs splice is a plus.
What is hoisting?
- A common answer is: hoisting is a mechanism which moves all declarations to the top of the execution scope. A good answer is understanding that JavaScript compiles your code before execution. When the compiler enters an execution context, it will start lexing (splitting your code) and analysing the code while creating a list out of the declarations it finds. Each time the compiler encounters a declaration, it will create a binding to it and each time it encounters an assignment or evaluation it will ask the current scope for the binding, if it can’t find the binding, it will go up until it reaches the global scope. If you have strict mode on, you will get an error and if you use the good old es5 it will create a new binding for you. This is why, you are able to assign to a variable which wasn’t declared before. Anyway, after running through some steps, it will generate some compiled code which can be then executed :).
What is the difference between array.map and array.forEach?
- This simple question apparently causes a lot of issue :) but the answer is very simple. While forEach executes a function for each element with the element as the function argument, map does almost the same but it returns a new array with the results of the function replacing the item in each step. The new array is of the same size as the original array.
- https://javascript.plainenglish.io/10-entry-level-react-interview-questions-5a8ea74e2130
Why should you use React instead of real JavaScript frameworks, like for example Angular?
Unlike Angular or Vue, React is just a library, which of course has its pros and cons. To focus on the pros:
React is more lightweight and allows the creation of dynamic applications. Also, since React is basically JS with some JSX, it’s easier to get started with. Using VDOM, makes web applications perform faster.
React uses a unidirectional data flow, which means that data flows from top to bottom. This makes debugging errors easier.
There are many chrome extensions that make working and debugging React applications easier. Here are three of my favorites: Components, Redux and React Context. There are others, but these are the primary ones I use in almost every application.
Since there is no React without JavaScript, you can definitely expect some JavaScript questions on the interview as well. Here are some of them.
JavaScript CS
The JavaScript Skills You Need For React
- https://medium.com/weekly-webtips/react-basics-whats-the-difference-between-javascript-and-jsx-604dd224b1cf
1. Function Declarations and Arrow Functions
// JavaScript function: returns any valid JavaScript type
function javascriptFunction() {
  return "Hello world";
}

// React function component: returns JSX
function ReactComponent(props) {
  return <h1>{props.content}</h1>;
}
- a function declaration, and as an arrow function
// Function declaration syntax
function MyComponent(props) {
  return <div>{props.content}</div>;
}

// Arrow function syntax
const MyComponent = (props) => {
  return <div>{props.content}</div>;
};

// Arrow function syntax (shorthand)
const MyComponent = (props) => <div>{props.content}</div>;

/*
In the last example we are using several shorthands that arrow functions allow:

1. No parentheses around a single parameter
2. Implicit return (as compared to using the "return" keyword)
3. No curly braces for function body
*/
- One small benefit of using function declarations over arrow functions is that you don't have to worry about problems with hoisting.
- Due to the JavaScript behavior of hoisting, you can use multiple function components made with function declarations in a single file in whichever order you like.
- Function components made with arrow functions, however, cannot be ordered whichever way you like. Because JavaScript variables are hoisted, arrow function components must be declared before they are used:
function App() {
  return (
    <>
      {/* Valid! FunctionDeclaration is hoisted */}
      <FunctionDeclaration />
      {/* Invalid! ArrowFunction is NOT hoisted. Therefore, it must be declared before it is used */}
      <ArrowFunction />
    </>
  );
}

function FunctionDeclaration() {
  return <div>Hello React!</div>;
}

function ArrowFunction() {
  return <div>Hello React, again!</div>;
}
- export diff
// Function declaration syntax can be immediately exported with export default or export
export default function App() {
  return <div>Hello React</div>;
}

// Arrow function syntax must use export only
export const App = () => {
  return <div>Hello React</div>;
};
2. Template Literals
/*
Concatenating strings prior to ES6.
Notice the awkward space after the word Hello?
*/
function sayHello(text) {
  return "Hello " + text + "!";
}

sayHello("React"); // Hello React!

/*
Concatenating strings using template literals.
See how much more readable and predictable this code is?
*/
function sayHelloAgain(text) {
  return `Hello again, ${text}!`;
}

sayHelloAgain("React"); // Hello again, React!
import React from "react";
import Head from "./Head";

function Layout(props) {
  // Shows site name (i.e. Reed Barger) at end of page title
  const title = `${props.title} | Reed Barger`;

  return (
    <>
      <Head>
        <title>{title}</title>
      </Head>
      <main>{props.children}</main>
    </>
  );
}
3. Short Conditionals: &&, ||, Ternary Operator
//Without ternary operator
import React from "react";

function App() {
  const isLoggedIn = true;

  if (isLoggedIn) {
    // Shows: Welcome back!
    return <div>Welcome back!</div>;
  }

  return <div>Who are you?</div>;
}

export default App;

//with ternory operator
import React from "react";

function App() {
  const isLoggedIn = true;

  // Shows: Welcome back!
  return isLoggedIn ? <div>Welcome back!</div> : <div>Who are you?</div>;
}

export default App;

//Ternary operators can also be used inside curly braces (again, since it is an expression):

import React from "react";

function App() {
  const isLoggedIn = true;

  // Shows: Welcome back!
  return <div>{isLoggedIn ? "Welcome back!" : "Who are you?"}</div>;
}

export default App;
4. Three Array Methods: .map(), .filter(), .reduce()
/* Note that this isn't exactly the same as the normal JavaScript .map() method, but is very similar. */
import React from "react";

function App() {
  const programmers = ["Reed", "John", "Jane"];

  return (
    <ul>
      {programmers.map((programmer) => (
        <li>{programmer}</li>
      ))}
    </ul>
  );
}

export default App;


//filter
import React from "react";

function App() {
  const programmers = ["Reed", "John", "Jane"];

  return (
    <ul>
      {/* Returns 'Reed' */}
      {programmers
        .filter((programmer) => !programmer.startsWith("J"))
        .map((programmer) => (
          <li>{programmer}</li>
        ))}
    </ul>
  );
}

export default App;

// reduce
import React from "react";

function App() {
  const programmers = ["Reed", "John", "Jane"];

  return (
    <ul>
      {/* Returns 'Reed' */}
      {programmers
        .filter((programmer) => !programmer.startsWith("J"))
        .map((programmer) => (
          <li>{programmer}</li>
        ))}
    </ul>
  );
}

export default App;
5. Object Tricks: Property Shorthand, Destructuring, Spread Operator
//bject destructuring.
const user = {
  name: "Reed",
  age: 28,
  isEnglishSpeaker: true,
};

// Dot property access
const name = user.name;
const age = user.age;

// Object destructuring
const { age, name, isEnglishSpeaker: knowsEnglish } = user;
// Use ':' to rename a value as you destructure it

console.log(knowsEnglish); // true


// Nested object destructuring in JavaScript
const user = {
  name: 'John Doe',
  age: 25,
  address: {
    street: '123 Main St',
    city: 'New York',
    country: 'USA'
  }
};

// Extracting values using nested object destructuring
const { name, age, address: { street, city, country } } = user;

// Spread operator
const user = {
  name: "Reed",
  age: 28,
  isEnglishSpeaker: true,
};

const firstUser = {
  name: user.name,
  age: user.age,
  isEnglishSpeaker: user.isEnglishSpeaker,
};

// Copy all of user's properties into secondUser
const secondUser = {
  ...user,
};

const user = {
  name: "Reed",
  age: 28,
};

const moreUserInfo = {
  age: 70,
  country: "USA",
};

// Copy all of user's properties into secondUser
const secondUser = {
  ...user,
  ...moreUserInfo,
  computer: "MacBook Pro",
};

console.log(secondUser);
// { name: "Reed", age: 70, country: "USA", computer: "Macbook Pro" }
6: Promises + Async/Await Syntax
- an external API using browser features like the Fetch API or the third-party library axios.
- Here is a real example of using React to fetch data from my GitHub API using the Fetch API to show my profile image. The data is resolved using promises:
/* Go to react.new and paste this code in to see it work! */
import React from "react";

const App = () => {
  const [avatar, setAvatar] = React.useState("");

  React.useEffect(() => {
    /*
      The first .then() lets us get JSON data from the response.
      The second .then() gets the url to my avatar and puts it in state.
    */
    fetch("https://api.github.com/users/reedbarger")
      .then((response) => response.json())
      .then((data) => setAvatar(data.avatar_url))
      .catch((error) => console.error("Error fetching data: ", error));
  }, []);

  return <img src={avatar} alt="Reed Barger" />;
};

export default App;
- Instead of always needing to use callbacks to resolve our data from a promise, we can use a cleaned syntax that looks identical to synchronous code, called the async/await syntax.
/* Go to react.new and paste this code in to see it work! */
import React from "react";

const App = () => {
  const [avatar, setAvatar] = React.useState("");

  React.useEffect(() => {
    /*
      Note that because the function passed to useEffect cannot be async, we must create a separate function for our promise to be resolved in (fetchAvatar)
    */
    async function fetchAvatar() {
      const response = await fetch("https://api.github.com/users/reedbarger");
      const data = await response.json();
      setAvatar(data.avatar_url);
    }

    fetchAvatar();
  }, []);

  return <img src={avatar} alt="Reed Barger" />;
};

export default App;
/* Go to react.new and paste this code in to see it work! */
import React from "react";

const App = () => {
  const [avatar, setAvatar] = React.useState("");

  React.useEffect(() => {
    async function fetchAvatar() {
      /* Using an invalid user to create a 404 (not found) error */
      const response = await fetch("https://api.github.com/users/reedbarge");
      if (!response.ok) {
        const message = `An error has occured: ${response.status}`;
        /* In development, you'll see this error message displayed on your screen */
        throw new Error(message);
      }
      const data = await response.json();

      setAvatar(data.avatar_url);
    }

    fetchAvatar();
  }, []);

  return <img src={avatar} alt="Reed Barger" />;
};

export default App;
7. ES Modules + Import / Export syntax
- named imports/exports and as default imports/exports.
// constants.js
export const name = "Reed";

export const age = 28;

export default function getName() {
  return name;
}

// app.js
// Notice that named exports are imported between curly braces
import getName, { name, age } from "../constants.js";

console.log(name, age, getName());
- You can also alias or rename what you are importing using the as keyword for named imports. The benefit of default exports is that they can be named to whatever you like.
// constants.js
const name = "Reed";

const age = 28;

function getName() {
  return name;
}

export { name, age };
export default getName;

// app.js
import getMyName, { name as myName, age as myAge } from "../constants.js";

console.log(myName, myAge, getMyName());
Callback Functions in JavaScript
- A callback function is a function that is performed after another function has completed its execution. It is typically supplied as an input into another function.
- Here's an example of a "click" event listener with a callback function that will be run whenever the button is clicked:
//HTML
<button class="btn">Click Me</button>

//JavaScript
const btn = document.querySelector('.btn');

btn.addEventListener('click', () => {
  let name = 'John doe';
  console.log(name.toUpperCase())
})
Promise
- callbackhell
setTimeout(() => {
    console.log("Joel");
    setTimeout(() => {
        console.log("Victoria");
        setTimeout(() => {
            console.log("John");
            setTimeout(() => {
                console.log("Doe");
                setTimeout(() => {
                    console.log("Sarah");
                }, 2000);
            }, 2000);
        }, 2000);
    }, 2000);
}, 2000);
- Finally, let's try to re-implement the callback hell as a promise:
function addName (time, name){
  return new Promise ((resolve, reject) => {
    if(name){
      setTimeout(()=>{
        console.log(name)
        resolve();
      },time)
    }else{
      reject('No such name');
    }
  })
}

addName(2000, 'Joel')
  .then(()=>addName(2000, 'Victoria'))
  .then(()=>addName(2000, 'John'))
  .then(()=>addName(2000, 'Doe'))
  .then(()=>addName(2000, 'Sarah'))
  .catch((err)=>console.log(err))
Rest and Spread Operators in JavaScript
- Spread operator
let pets= ["cat", "dog" , "rabbits"];

let carnivorous = ["lion", "wolf", "leopard", "tiger"];

let animals = [...pets, ...carnivorous];

console.log(animals); //["cat", "dog" , "rabbits", "lion", "wolf", "leopard", "tiger"]

let name = {firstName:"John", lastName:"Doe"};
let hobbies = { hobby1: "singing", hobby2: "dancing" }
let myInfo = {...name, ...hobbies};

console.log(myInfo); //{firstName:"John", lastName:"Doe", hobby1: "singing", hobby2: "dancing"}
- rest
let fruits= ["Mango", "Pineapple" , "Orange", "Lemon", "Apple"];
const [firstFruit, secondFruit, ...rest] = fruits

console.log(firstFruit, secondFruit, rest); //"Mango" "Pineapple" ["Orange","Lemon","Apple"]
const chosenFruit = rest.find((fruit) => fruit === "Apple");

console.log(`This is an ${chosenFruit}`); //"This is an Apple"

const Susan = {
  firstName: "Susan",
  lastName: "Steward",
  age: 14,
  hobbies: {
    hobby1: "singing",
    hobby2: "dancing"
  }
};

const {age, ...rest} = Susan;
console.log(age, rest);
/*
14
{
firstName: "Susan" ,
lastName: "Steward" ,
hobbies: {...}
} */
React-JavaScript Sysntax Comparision
Data binding
- javascript
let myData = 'Hello';
document.getElementById('my-element').innerHTML = myData;
- react
import React, { useState } from 'react';
function MyComponent() {
  const [myData, setMyData] = useState('Hello');
  return (
    <div id="my-element">{myData}</div>
  );
}
Event binding:
- javascript
document.getElementById('my-button').addEventListener('click', myFunction);
function myFunction() {
  console.log('Button clicked');
}
- react
import React from 'react';
function MyComponent() {
  function myFunction() {
    console.log('Button clicked');
  }
  return (
    <button onClick={myFunction}>Click me</button>
  );
}
Class binding:
- javascript
document.getElementById('my-element').classList.add('my-class');
- react
import React from 'react';
function MyComponent() {
  const [isMyClass, setIsMyClass] = useState(false);
  function toggleClass() {
    setIsMyClass(!isMyClass);
  }
  return (
    <div className={isMyClass ? 'my-class' : ''} onClick={toggleClass}>My Element</div>
  );
}
Style binding:
- javascript
document.getElementById('my-element').style.color = 'red';
- react
import React from 'react';
function MyComponent() {
  const myStyle = {
    color: 'red'
  };
  return (
    <div style={myStyle}>My Element</div>
  );
}
DOM manipulation
- javascript
const div = document.createElement('div');
const h1 = document.createElement('h1');
const p = document.createElement('p');
h1.innerHTML = 'Hello, World!';
p.innerHTML = 'This is a plain JavaScript element.';
div.appendChild(h1);
div.appendChild(p);
- react
function MyComponent() {
  return (
    <div>
      <h1>Hello, World!</h1>
      <p>This is a React component.</p>
    </div>
  );
}
Function calling:
- javascript
function myFunction() {
  console.log('Hello');
}
myFunction();
- react
import React, { useEffect } from 'react';
function MyComponent() {
  function myFunction() {
    console.log('Hello');
  }
  useEffect(() => {
    myFunction();
  }, []);
  return (
    <div>My Component</div>
  );
}
JSX-JavaScript-HTML syntax Comparision
Element rendering:
- jsx
const element = <h1>Hello, world!</h1>;
ReactDOM.render(element, document.getElementById('root'));
- html
<h1>Hello, world!</h1>
- js
const h1 = document.createElement('h1');
h1.innerHTML = 'Hello, world!';
document.getElementById('root').appendChild(h1);
Element attributes:
- jsx
const element = <img src={imageUrl} alt="image" />;
- html
<img src="image.jpg" alt="image" />
- js
const img = document.createElement('img');
img.src = 'image.jpg';
img.alt = 'image';
Styling
- jsx
const element = <div style={{ color: 'red', backgroundColor: 'yellow' }}>Hello, world!</div>;
- html
<div style="color: red; background-color: yellow;">Hello, world!</div>
- js
const div = document.createElement('div');
div.innerHTML = 'Hello, world!';
div.style.color = 'red';
div.style.backgroundColor = 'yellow';
Conditionals
- jsx
const element = (
  <div>
    {isLoggedIn ? (
      <LogoutButton onClick={handleLogoutClick} />
    ) : (
      <LoginButton onClick={handleLoginClick} />
    )}
  </div>
);
- html
- js
<div id="root"></div>
<script>
  if (isLoggedIn) {
    const button = document.createElement('button');
    button.innerHTML = 'Logout';
    button.addEventListener('click', handleLogoutClick);
    document.getElementById('root').appendChild(button);
  } else {
    const button = document.createElement('button');
    button.innerHTML = 'Login';
    button.addEventListener('click', handleLoginClick);
    document.getElementById('root').appendChild(button);
  }
</script>
Loops:
- jsx
const numbers = [1, 2, 3, 4, 5];
const listItems = numbers.map((number) =>
  <li>{number}</li>
);

const element = (
  <ul>
    {listItems}
  </ul>
);
- html
- js
<ul id="list"></ul>
<script>
  const numbers = [1, 2, 3, 4, 5];
  const ul = document.getElementById('list');
  for (let i = 0; i < numbers.length; i++) {
    const li = document.createElement('li');
    li.innerHTML = numbers[i];
    ul.appendChild(li);
  }
</script>
- jsx